How to Spot Lawn Grubs Before They Destroy Your Grass

How to Spot Lawn Grubs Before They Destroy Your Grass

Imagine walking across your lawn only to notice that your once lush, green grass feels spongy beneath your feet—or worse, is turning brown in random patches. This could be the work of lawn grubs, one of the most damaging and often overlooked pests in residential landscapes.

Lawn grubs, the larvae of various beetles such as Japanese beetles, June bugs, and European chafers, live beneath the soil and feed on grassroots. Left unchecked, they can destroy entire sections of turf, leaving costly damage and attracting other pests like raccoons, moles, and skunks who dig to eat them.

The good news? You can catch them early. In this article, we’ll cover how to identify, spot, and control lawn grubs before they turn your lawn into a patchy, brown mess.


What Are Lawn Grubs?

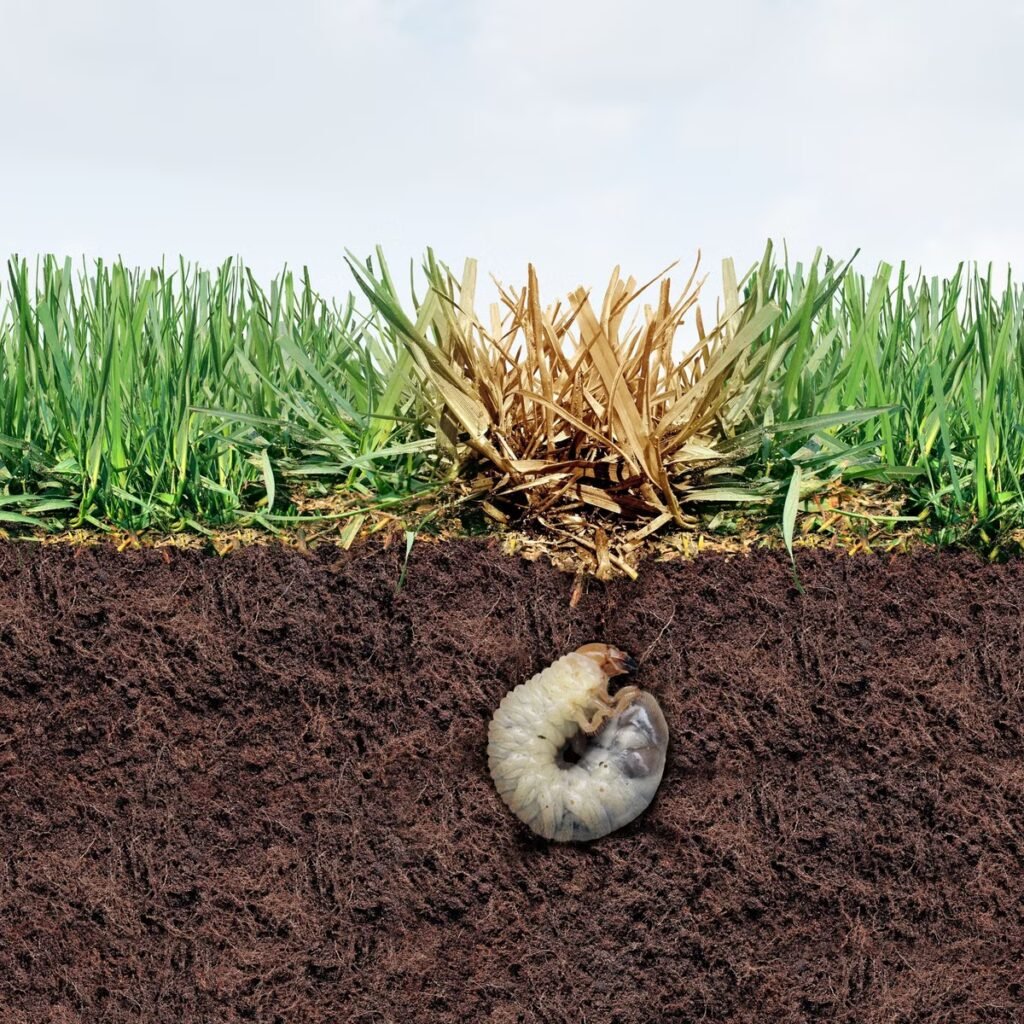
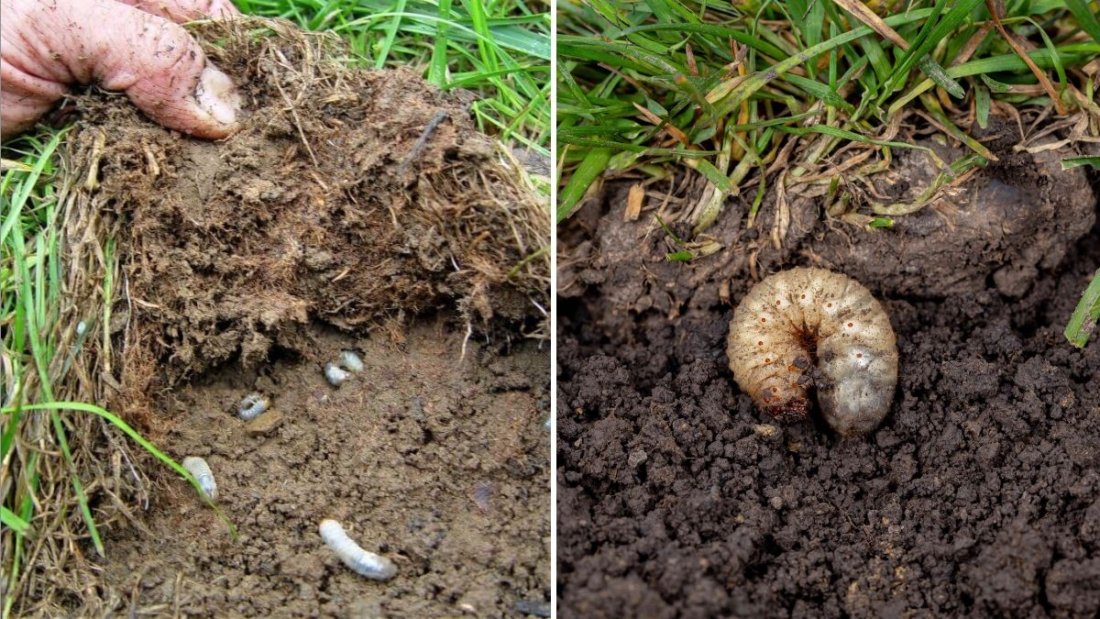
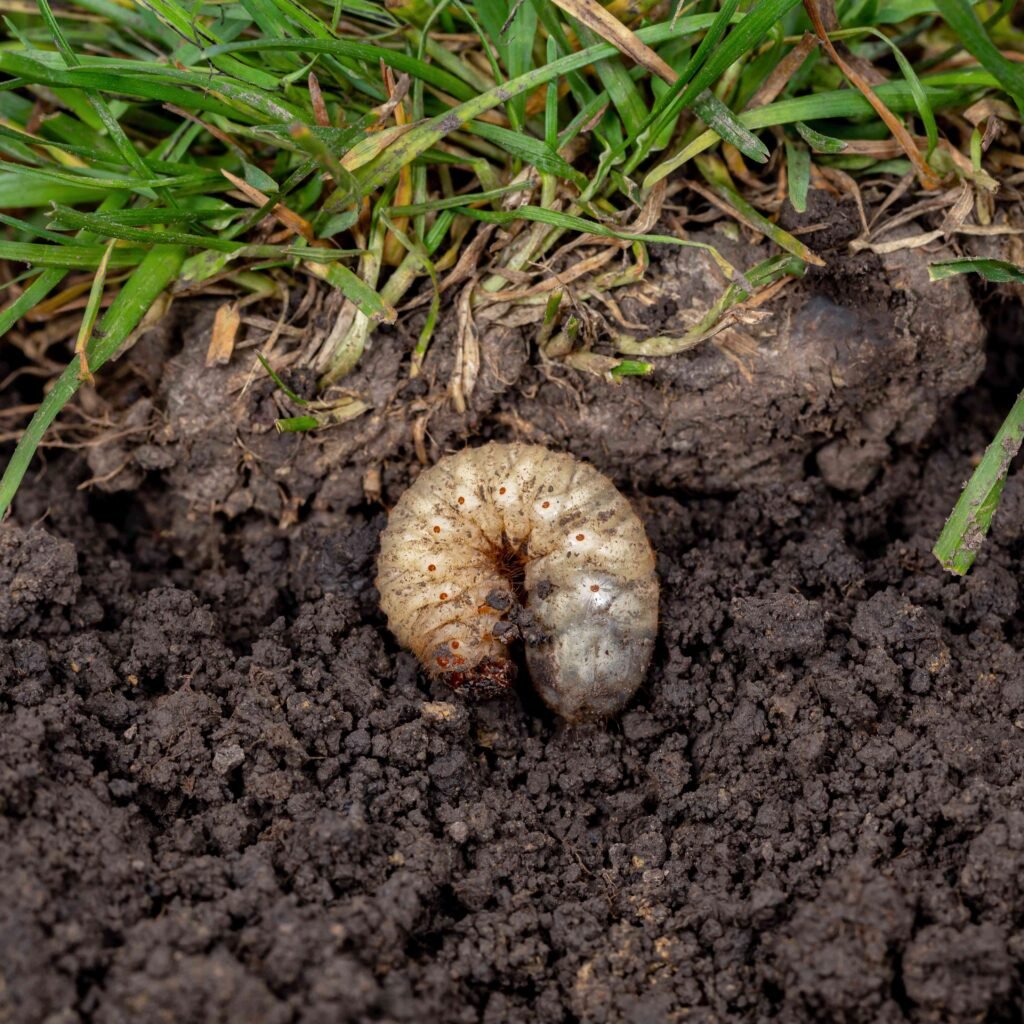
Lawn grubs are C-shaped, white larvae with soft bodies and a brownish head. They are typically ½ to 1 inch long and live just beneath the surface of your soil, feeding on grassroots, which provide your lawn with essential nutrients and anchorage.

These pests are the immature form of beetles. Common grub-producing beetles include:

  • Japanese beetles
  • June beetles
  • European chafers
  • Oriental beetles

Grubs typically emerge in late summer and early fall, feeding voraciously before overwintering underground and reemerging in spring to complete their life cycle.


Why Lawn Grubs Are So Damaging

While a few grubs won’t destroy your lawn, a large population (10+ per square foot) can severely impact turf health. As they chew on roots, your lawn loses its ability to absorb water and nutrients. This leads to:

  • Browning or thinning patches
  • Spongy or loose turf
  • Increased water runoff and erosion
  • Attraction of predators that dig up your yard

By the time you see visible damage, it’s often too late to reverse the worst of it—which is why early detection is key.


How to Spot Lawn Grubs Early

Here are the top early warning signs that your lawn may be under attack:

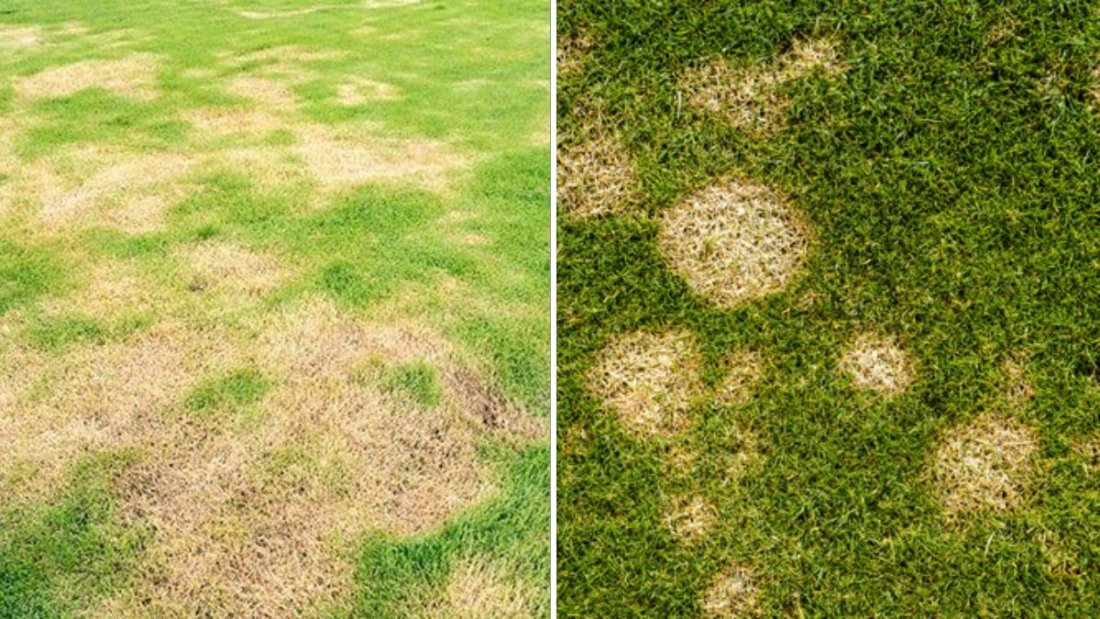
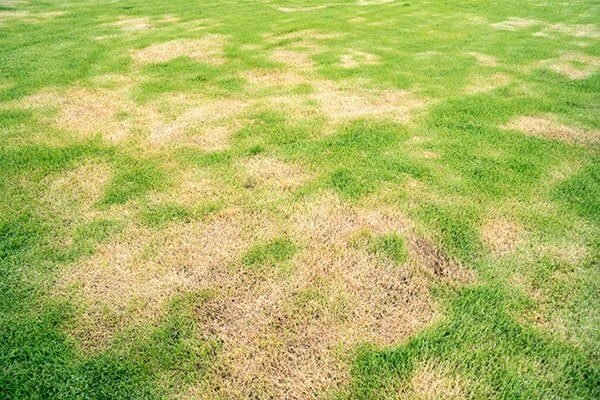
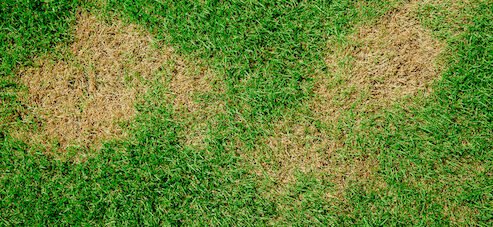
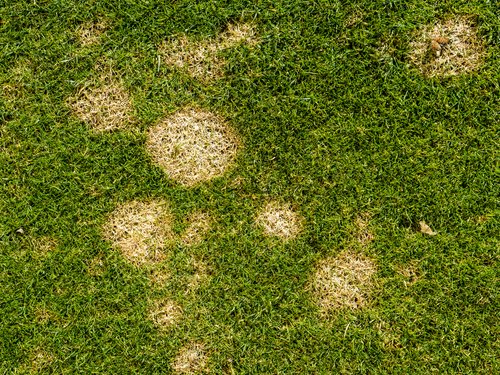
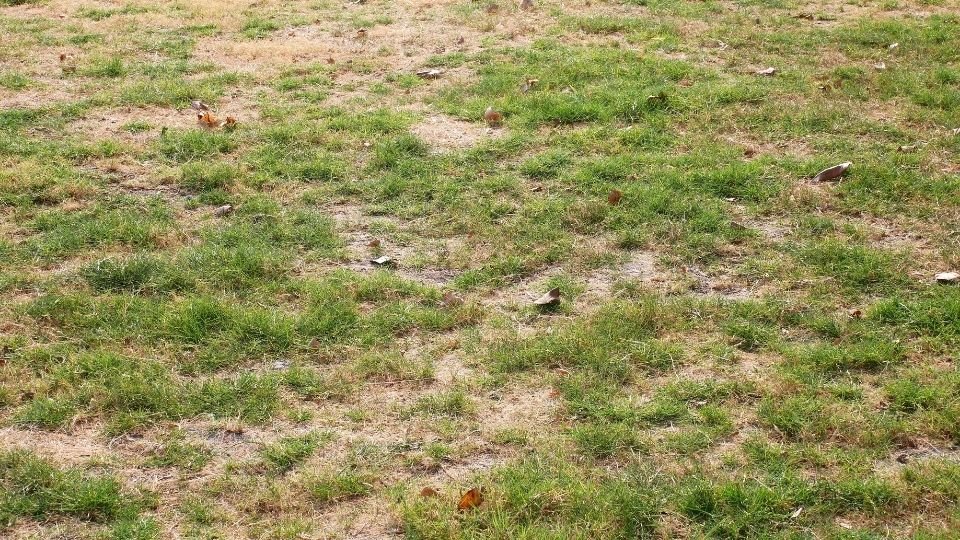
1. Irregular Brown Patches

  • Small, brown or yellow patches may start appearing, particularly in late summer or early fall.
  • These patches don’t improve with watering and gradually spread.

2. Spongy or Loose Turf

  • The grass may feel soft and springy underfoot.
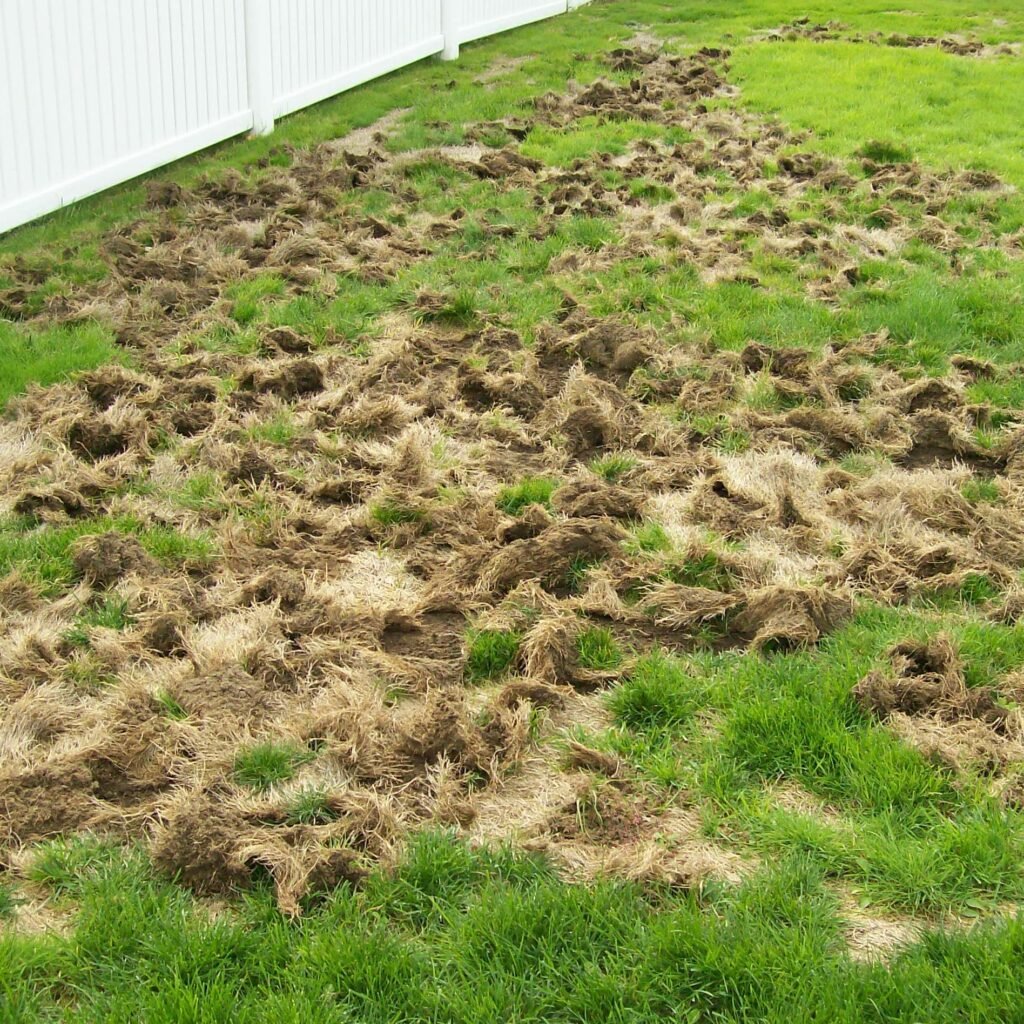
  • If grubs have eaten the roots, you’ll be able to lift up the turf like a carpet with little resistance.

3. Increased Wildlife Activity

  • Birds, raccoons, skunks, or moles suddenly digging in your yard?
  • They’re likely feeding on grubs—a sign of infestation.

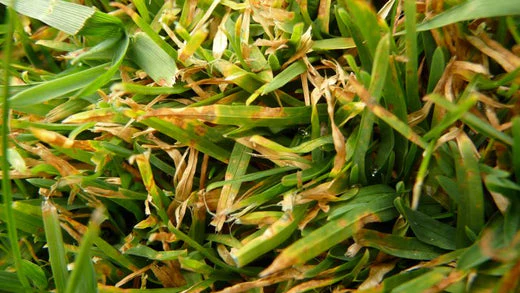
4. Wilting Despite Adequate Watering

  • Grass wilts even though you’re watering regularly.
  • Damaged roots can’t absorb moisture, so the grass looks drought-stressed.

5. Beetles in Summer

  • A high number of beetles in June–July (especially Japanese beetles) may indicate a higher chance of grub problems later in the season.

How to Check for Grubs

If you suspect grubs, perform this simple DIY soil test:

Step-by-Step Grub Test:

  1. Choose a few areas of your lawn—especially near damaged patches.
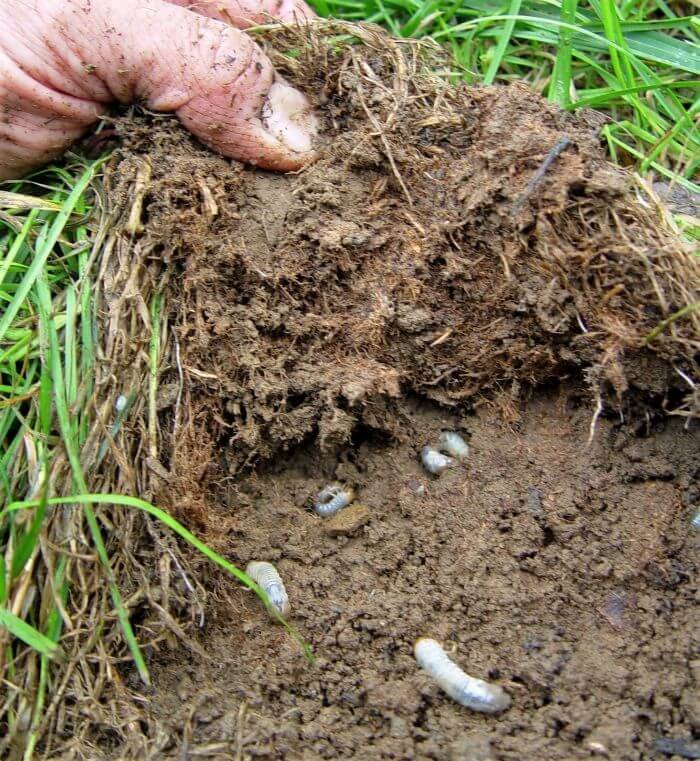
  2. Use a shovel or spade to cut a 1 square foot section of turf about 2–4 inches deep.
  3. Gently peel back the turf and inspect the soil underneath.
  4. Count how many white C-shaped grubs you find.

0–5 grubs per sq. ft. = Low population, probably not a concern
6–9 grubs per sq. ft. = Watch closely, potential for damage
10+ grubs per sq. ft. = Likely to cause significant damage

Repeat in multiple locations to get an accurate picture.


When Are Grubs Most Active?

Understanding their life cycle helps in both spotting and controlling them.

Lawn Grub Life Cycle:

  • Late Spring to Early Summer: Beetles emerge, mate, and lay eggs in the soil.
  • Mid to Late Summer (July–September): Eggs hatch into larvae (grubs), which begin feeding heavily on roots.
  • Fall: Grubs burrow deeper to overwinter.
  • Spring: They resurface, feed briefly, then pupate into beetles.

Best time to inspect and control grubs: Late summer to early fall, when they are near the surface and actively feeding.


How to Prevent Lawn Grubs

1. Maintain a Healthy Lawn

  • Keep your grass well-fertilized and watered.
  • Healthy turf is more resistant to grub damage and recovers faster.

2. Don’t Overwater

  • Beetles prefer to lay eggs in moist soil.
  • Avoid excessive watering in July and August when beetles are active.

3. Mow Higher

  • Taller grass discourages beetles from laying eggs.
  • Maintain a mowing height of 3 to 4 inches during peak beetle season.

Natural and Organic Grub Control

If you’ve spotted grubs, act quickly. Here are eco-friendly methods recommended by lawn experts:

1. Beneficial Nematodes

  • These microscopic worms attack and kill grubs.
  • Best applied in late summer to early fall, when grubs are near the surface.
  • Water the lawn before and after application.

2. Milky Spore Disease

  • A natural bacteria (Bacillus popilliae) that targets Japanese beetle grubs.
  • Safe for humans, pets, and beneficial insects.
  • Takes 1–2 years to establish but offers long-term protection for up to 10 years.

3. Neem Oil

  • An organic pesticide that disrupts grub growth and feeding.
  • Apply during the early grub stage (late summer).
  • Also repels adult beetles.

Chemical Grub Control (Use Sparingly)

If infestation is severe and natural methods aren’t enough, consider chemical treatments—but choose products carefully.

Preventive Insecticides

Apply in early to mid-summer before grubs hatch:

  • Imidacloprid
  • Chlorantraniliprole (safer for bees and non-target insects)

Curative Insecticides

Use in late summer or early fall if grubs are already present:

  • Carbaryl
  • Trichlorfon

Important: Always follow label instructions and avoid applying chemicals near water sources or pollinator habitats.


After Treatment: Lawn Recovery Tips

If grubs have already damaged your lawn, follow up with these steps:

  • Rake and remove dead patches
  • Aerate to loosen compacted soil and promote root growth
  • Topdress with compost to improve soil health
  • Overseed with a hardy grass blend in early fall or spring
  • Water deeply and consistently to support new roots

Common Grub Myths Debunked

  • Myth: All white grubs are bad
    Fact: Some white larvae are harmless (like those of green June beetles). Proper identification is key.
  • Myth: You should treat for grubs every year
    Fact: Only treat when grub counts are high. Overuse of insecticides can harm soil health.
  • Myth: Grub damage happens in spring
    Fact: Most damage occurs in late summer and fall, not spring.

Conclusion

Lawn grubs may be small, but their impact can be massive—especially when they go unnoticed. By learning to recognize early warning signs, conducting soil inspections, and responding proactively, you can spot and stop grubs before they destroy your grass.

Whether you choose natural controls like nematodes and milky spore, or reserve chemical treatments for emergencies, a vigilant and informed approach will help you maintain a beautiful, green lawn—grub-free.


Why Your Grass Turns Yellow—and How to Fix It Fast

Why Your Grass Turns Yellow—and How to Fix It Fast

There’s nothing more frustrating than looking out at your lawn and seeing yellow patches where you once had a lush, green carpet. A yellowing lawn isn’t just unsightly — it’s often a sign that something deeper is wrong. But don’t worry. In most cases, yellow grass is a symptom that can be reversed with the right approach.

This guide will walk you through why grass turns yellow, how to diagnose the problem, and most importantly — how to fix it fast.


1. Why Is Your Grass Turning Yellow?

There are several reasons why your grass may be turning yellow. Let’s break them down:

A. Nutrient Deficiencies (Especially Nitrogen and Iron)

  • Nitrogen Deficiency: Nitrogen is essential for chlorophyll production — the pigment that makes grass green. If your lawn lacks nitrogen, it can turn pale or yellow.
  • Iron Deficiency (Chlorosis): Iron is also crucial for healthy green grass. When iron is lacking, grass blades may appear yellow while the veins remain green.
  • Other nutrients like magnesium or manganese can also play a role, but nitrogen and iron are the most common culprits.

B. Overwatering or Underwatering

  • Too Much Water: Oversaturated soil can suffocate the roots by cutting off oxygen. It also encourages root rot and fungal growth.
  • Too Little Water: Drought or insufficient watering stresses grass, causing it to dry out and yellow.
  • Inconsistent watering — alternating between overwatering and underwatering — also puts stress on grass, leading to discoloration.

C. Soil Compaction

When soil becomes compacted, it reduces the flow of air, water, and nutrients to the roots. This starves the grass and causes it to yellow. Compaction usually occurs from heavy foot traffic, lawn equipment, or natural settling over time.

D. Thatch Buildup

Thatch is a layer of organic matter that builds up between the green grass and soil. While a thin layer is healthy, too much (over ½ inch) can block water, air, and nutrients from reaching the roots.

E. Mowing Mistakes

  • Cutting Too Short (Scalping): Removing too much grass at once shocks the plant and can damage the crown (where new blades grow).
  • Dull Mower Blades: These tear instead of cutting cleanly, leaving jagged edges that brown or yellow.
  • Mowing Wet Grass: This can damage blades and increase disease risk.

F. Pests and Disease

  • Grubs and Insects: These pests feed on grass roots, weakening the plant and turning it yellow.
  • Fungal Diseases: Conditions like brown patch, dollar spot, or rust disease often present as yellow or brown patches.
  • Pet Urine: Especially from dogs, it can create high concentrations of nitrogen and salt, which burn the grass.

G. Environmental or Chemical Damage

  • Fertilizer Burn: Applying too much fertilizer or using it incorrectly can scorch your lawn.
  • Herbicide Injury: Overspray or using the wrong weed killer can harm turf.
  • Vehicle or Foot Traffic: Repeated compression and wear can stress or kill grass.

H. Natural Dormancy

Some types of grass naturally turn yellow during extreme temperatures or seasonal changes. Warm-season grasses like Bermuda or Zoysia may go dormant and yellow in cooler months, while cool-season grasses like Fescue can yellow in extreme heat.


2. How to Diagnose the Cause of Yellow Grass

Before jumping to solutions, it’s essential to identify the cause. Here’s a step-by-step diagnostic approach:

  1. Look at the Pattern
    • Uniform yellowing across the lawn suggests a general issue (like nutrients or watering).
    • Patches or rings of yellow? Think pests, disease, or pet damage.
  2. Feel the Soil
    • Is it too wet? Too dry? Compacted?
    • Try sticking a screwdriver into the ground — if it’s hard to push in, the soil is likely compacted.
  3. Check Mowing Practices
    • Are the blades sharp?
    • Are you cutting more than ⅓ of the grass height at once?
    • Are you mowing too low?
  4. Test the Soil
    • A basic soil test will reveal nutrient deficiencies and pH imbalances.
    • Kits are available at garden centers or online, or you can send a sample to a lab.
  5. Inspect for Pests or Fungi
    • Roll back a section of turf to look for grubs.
    • Check for moldy patches, webbing, or spots that indicate fungal diseases.

Now that you know what’s causing the issue, let’s dive into effective solutions:

3. How to Fix Yellow Grass — Fast!

A. Correct Nutrient Deficiencies

  • Apply a Nitrogen-Rich Fertilizer: Use a slow-release lawn fertilizer with nitrogen if your lawn is pale or stunted.
  • Add Iron if Needed: Products like iron chelate can quickly green up a lawn without promoting excessive growth.
  • Avoid Over-Fertilizing: More is not better. Overuse can burn grass and worsen the problem.

B. Adjust Watering Routine

  • Water Deeply, Not Frequently: Give your lawn about 1–1.5 inches of water per week, ideally early in the morning.
  • Avoid Daily Light Watering: This encourages shallow roots.
  • Improve Drainage: If water pools or runs off, consider aeration or adding organic material to improve soil structure.

C. Aerate Compacted Soil

  • Use a core aerator to pull plugs of soil from the lawn.
  • Do this in spring or fall when the grass is actively growing.
  • Follow up with a topdressing of compost to enhance soil health.

D. Remove Excess Thatch

  • Use a thatching rake or power dethatcher to break up thick layers.
  • After dethatching, water and fertilize to help the lawn recover.

E. Improve Mowing Practices

  • Keep Blades Sharp: Sharpen your mower blades regularly.
  • Follow the ⅓ Rule: Never cut more than one-third of the grass blade height in a single mowing.
  • Set the Right Height: Different grass species have different ideal heights. Learn your grass type’s needs.

F. Address Pests and Disease

  • Grubs: Apply a grub killer or natural remedy like beneficial nematodes.
  • Fungal Diseases: Use a lawn fungicide if needed and avoid watering at night.
  • Pet Urine: Water the area immediately after your pet urinates. You can also train them to use a designated spot.

G. Patch and Reseed

  • For dead or bare areas, rake out the dead grass, loosen the soil, and reseed with a matching grass type.
  • Keep the soil moist until new grass establishes.

4. Preventing Yellow Grass in the Future

The best way to avoid yellowing is by establishing a strong lawn care routine. Here are some top tips:

  • Test your soil annually to monitor pH and nutrient levels.
  • Fertilize regularly — but based on what your soil actually needs.
  • Mow properly with sharp blades and the right height setting.
  • Aerate every 1–2 years to relieve compaction.
  • Dethatch as needed, especially if you have warm-season grass.
  • Water wisely — deeply and less often.
  • Watch for signs of pests or disease early before they spread.

5. Quick Fix Recovery Plan (4 Steps)

Here’s a basic four-step recovery plan you can start today:

StepActionPurpose
1Deep water the lawnRevives roots and hydrates soil
2Aerate compacted areasImproves airflow and drainage
3Apply appropriate fertilizerReplenishes missing nutrients
4Overseed bare spotsFills in patchy or dead areas

You’ll start to see signs of improvement in 7 to 14 days. Full recovery may take a few weeks depending on the severity and grass type.


Conclusion

A yellow lawn can be a wake-up call — but it’s not a death sentence. With a little detective work and some timely care, you can restore your grass to a lush, healthy green. Whether it’s fixing your watering routine, adjusting your mowing habits, or treating pests, each step takes you closer to a picture-perfect lawn.

Remember: Healthy soil equals healthy grass. Treat the root cause, not just the symptom — and your lawn will thank you.

How to Plant a Maple Tree for Stunning Fall Color

How to Plant a Maple Tree for Stunning Fall Color

Few trees can rival the beauty of a maple tree in autumn. As the seasons change, maples burst into brilliant shades of scarlet, amber, gold, and crimson, transforming any landscape into a vibrant, picturesque scene. Whether you’re looking to boost curb appeal or simply enjoy the annual show of color in your own backyard, planting a maple tree is one of the best investments you can make.

But to get those dazzling fall colors, planting a maple tree isn’t just about digging a hole and adding water. From choosing the right variety to proper planting, care, and location, every detail matters.

In this guide, you’ll learn how to plant a maple tree the right way—for maximum beauty, vibrant autumn colors, and long-term health.


Why Choose a Maple Tree?

Maples are beloved for several reasons:

  • Spectacular Fall Foliage – Known for fiery reds, oranges, and yellows
  • Fast to Moderate Growth – Many species establish quickly
  • Shade Provider – Broad canopies offer excellent summer shade
  • Adaptable – Tolerant of a wide range of soil and climate conditions
  • Low Maintenance – Once established, most maples are easy to care for

Best Maple Varieties for Fall Color

Not all maple trees display the same intensity of color. Some are famous for their bright hues, while others are more subdued. If fall foliage is your main goal, choose one of these standout species:

1. Red Maple (Acer rubrum)

  • Height: 40–60 feet
  • Fall Color: Bright red, orange, and yellow
  • Notes: Fast-growing and highly adaptable to various soil types

2. Sugar Maple (Acer saccharum)

  • Height: 60–75 feet
  • Fall Color: Golden yellow, burnt orange, and red
  • Notes: The classic “New England” fall foliage tree; prefers well-drained, slightly acidic soil

3. October Glory Maple (Acer rubrum ‘October Glory’)

  • Height: 40–50 feet
  • Fall Color: Deep red to purple
  • Notes: Holds onto its leaves longer than most, extending fall color into late autumn

4. Autumn Blaze Maple (Acer × freemanii)

  • Height: 40–55 feet
  • Fall Color: Brilliant red-orange
  • Notes: A hybrid between red and silver maple; fast-growing and hardy

5. Japanese Maple (Acer palmatum)

  • Height: 10–25 feet (varies by cultivar)
  • Fall Color: Rich red, burgundy, or golden orange
  • Notes: Great for smaller yards or ornamental gardens; prefers partial shade

Step 1: Choose the Right Location

Location is everything when it comes to planting for long-term success and fall color intensity.

What to Look For:

  • Full Sun – Aim for at least 6 hours of direct sunlight per day. More sunlight usually means brighter fall color.
  • Well-Drained Soil – Maples dislike soggy roots. Avoid low-lying or poorly draining spots.
  • Space to Grow – Be sure to plant far enough from homes, power lines, and other trees. Larger maples may need 30–40 feet of spacing.

Pro Tip:

Test your soil pH. Most maples prefer slightly acidic soil (pH 5.5–6.5). You can amend your soil with sulfur or compost to increase acidity if needed.


Step 2: When to Plant a Maple Tree

The best time to plant maple trees is during the dormant seasons: early spring or fall.

Best Times:

  • Early spring – Before buds break
  • Mid to late fall – After leaves drop, but before the ground freezes

Planting during dormancy allows roots to establish before the tree puts energy into leaf or seed production.


Step 3: How to Plant Your Maple Tree – Step-by-Step

What You’ll Need:

  • Maple sapling or young tree (bare root or container-grown)
  • Shovel
  • Compost or organic matter
  • Mulch
  • Garden hose or watering can

Planting Instructions:

  1. Dig the Right Hole
    • Width: 2–3 times the diameter of the root ball
    • Depth: Equal to the height of the root ball (not deeper)
  2. Loosen the Roots
    • For container trees, gently loosen tangled roots. For bare root trees, soak roots in water for 2–3 hours before planting.
  3. Place the Tree
    • Set the tree in the center of the hole. The top of the root ball should be level with or slightly above ground level.
  4. Backfill with Soil
    • Mix your native soil with compost or aged manure. Backfill gently, pressing down to remove air pockets.
  5. Water Thoroughly
    • Water immediately after planting until the soil is saturated. Keep the root zone moist (but not soggy) during the first year.
  6. Mulch the Base
    • Apply 2–3 inches of mulch around the base to retain moisture and suppress weeds—but keep it a few inches away from the trunk to prevent rot.

Step 4: Watering and Caring for Your Maple Tree

Proper care in the first 1–2 years is crucial for establishing a strong root system.

Watering Tips:

  • First 3 weeks: Water every 2–3 days
  • Next 6 months: Water weekly (unless there is consistent rainfall)
  • Second year: Deep water every 10–14 days during dry spells

Avoid overwatering. A good rule: Stick your finger into the soil—if it feels dry two inches down, it’s time to water.


Step 5: Pruning and Maintenance

Maple trees don’t require heavy pruning, but some maintenance helps ensure strong structure and health.

Best Time to Prune:

  • Late winter or early spring before new growth appears

Prune to:

  • Remove dead or damaged limbs
  • Shape the tree (especially for young trees)
  • Prevent crowded or crossing branches

Avoid topping your maple tree—this can ruin its shape and stress the tree.


Bonus Tips for Vivid Fall Color

Fall color is affected by genetics, sunlight, soil, and weather. Here’s how to get the brightest display:

Ensure Full Sun

Shade-grown maples tend to have duller fall colors. Plant in a location with maximum sunlight.

Keep Your Tree Healthy

Pest infestations, drought stress, or poor nutrition can dull leaf color or cause early leaf drop.

Mulch and Fertilize Properly

Use organic mulch to regulate soil temperature. Fertilize in early spring (if needed), but avoid high-nitrogen fertilizers—they promote leaf growth at the expense of color.

Avoid Soil Compaction

Don’t park vehicles or store heavy items under the canopy. Compacted soil limits oxygen and water uptake.


Common Mistakes to Avoid

  • Planting too deep: This can suffocate the roots and lead to rot.
  • Overwatering: Maples need consistent, not constant, moisture.
  • Ignoring pests or disease: Aphids, scale, and verticillium wilt can weaken maples and reduce their fall color.
  • Planting too close to structures: Large maples need ample space to grow. Avoid planting near foundations, driveways, or underground pipes.

Final Thoughts

Planting a maple tree is more than just a landscaping decision—it’s an investment in years of breathtaking autumn beauty. With the right species, proper location, and a little care, your maple tree will reward you with brilliant, fiery foliage each fall—turning your yard into a natural masterpiece.

So grab a shovel, pick your favorite maple, and get ready to enjoy the best show of the season—right outside your window.

10 Trees With Roots That Can Damage Your Home’s Foundation

10 Trees With Roots That Can Damage Your Home’s Foundation

Trees are a wonderful part of any landscape. They provide shade, improve air quality, enhance curb appeal, and even raise property value. However, not all trees are friendly neighbors to your home—especially those with invasive or aggressive root systems. When planted too close, these trees can cause serious damage to your foundation, plumbing, driveway, and sidewalks.

The truth is: tree roots don’t need to break concrete to cause damage. Simply by altering the moisture and stability of the soil, or infiltrating small cracks, roots can compromise the structural integrity of your home over time.

In this guide, we’ll walk you through 10 trees with roots that can damage your home’s foundation, explain why they’re risky, and offer suggestions for safe landscaping practices.


How Tree Roots Affect Foundations

Before we dive into specific species, it’s helpful to understand how roots interact with your home:

  • Soil Displacement: Roots expand as they grow, displacing soil and pushing against structures like patios, walkways, and foundations.
  • Moisture Extraction: Tree roots absorb water from the soil, which can cause the ground to shrink or shift, leading to foundation settling or cracks.
  • Structural Pressure: In poorly built or shallow foundations, thick root systems can exert upward or lateral pressure.
  • Crack Infiltration: Roots are opportunistic. They follow water and air, and can grow into existing cracks in foundations or sewer lines, making them worse.

10 Trees Known for Damaging Roots

Here are 10 common trees with root systems that are known to be problematic if planted too close to buildings:


1. Silver Maple (Acer saccharinum)

Why it’s risky:
This fast-growing shade tree is a favorite for quick landscaping—but comes with a major downside. Silver maples have extremely aggressive, shallow roots that seek moisture relentlessly. They are infamous for invading foundations, septic systems, and drainpipes.

Safe planting distance: 50 feet or more from structures.


2. Willow Tree (Salix species)

Why it’s risky:
Whether weeping willow or black willow, this tree family is notorious for its massive, thirsty root systems. Willows naturally grow along rivers and wetlands, so their roots are excellent at tracking down water—sometimes beneath your home.

Safe planting distance: 75 feet minimum.


3. American Elm (Ulmus americana)

Why it’s risky:
These classic street trees once lined neighborhoods across the U.S. Their roots grow horizontally and can travel well beyond the canopy. They’re known to cause sidewalk upheaval and may draw moisture from under foundations.

Safe planting distance: At least 40–50 feet from buildings.


4. Eucalyptus Tree (Eucalyptus species)

Why it’s risky:
Eucalyptus trees are fast growers with deep, widespread root systems. While they provide nice shade and fragrance, they are notorious for root damage. In urban areas, they often crack driveways, foundations, and sewer lines.

Safe planting distance: Minimum 60–70 feet.


5. Sycamore (Platanus occidentalis)

Why it’s risky:
Sycamores are majestic and hardy—but their size comes with large root systems that displace soil and increase the risk of shifting or cracking foundations. Their roots can extend up to 100 feet.

Safe planting distance: 50+ feet away.


6. Cottonwood (Populus deltoides)

Why it’s risky:
Cottonwoods are part of the poplar family, all of which have aggressive, fast-growing root systems. These roots grow near the surface, making them likely to interfere with driveways, patios, and even pipes.

Safe planting distance: 75 feet minimum.


7. Bradford Pear (Pyrus calleryana)

Why it’s risky:
Bradford pears were once planted everywhere due to their symmetrical shape and spring blossoms. But they have shallow roots and weak wood, making them prone to breakage and root intrusion near homes.

Safe planting distance: 25–30 feet.


8. Poplar Tree (Populus species)

Why it’s risky:
Poplars are among the most aggressive trees in terms of root spread. Their roots will head straight for water lines, foundations, and drainage systems—leading to major underground damage.

Safe planting distance: 60–75 feet or more.


9. Tree of Heaven (Ailanthus altissima)

Why it’s risky:
This invasive species spreads rapidly via underground suckers. It can grow in almost any soil and destroys foundations, sidewalks, and underground utilities as it expands.

Safe planting distance: Avoid entirely near homes.


10. Black Locust (Robinia pseudoacacia)

Why it’s risky:
The black locust is a hardy tree with a widespread root system. It produces suckers that can sprout up far from the main trunk. Left unchecked, it can compromise foundation integrity and overwhelm other plants.

Safe planting distance: 40–50 feet.


Signs That Roots Are Damaging Your Foundation

Not sure if nearby trees are causing trouble? Look for these common warning signs:

  • Cracks in walls or ceilings
  • Uneven floors or sticking doors
  • Cracked or raised driveways and patios
  • Visible tree roots close to your foundation
  • New leaks or moisture in your basement

If you’re seeing any of these symptoms, it may be time to call both an arborist and a foundation specialist for an inspection.


Smart Landscaping: Avoiding Root-Related Damage

To protect your home while still enjoying the beauty of trees, follow these best practices:

Choose the Right Species

Opt for trees with non-invasive root systems, such as:

  • Japanese Maple (Acer palmatum)
  • Eastern Redbud (Cercis canadensis)
  • Serviceberry (Amelanchier)
  • Dogwood (Cornus)
  • Crape Myrtle (Lagerstroemia)

These tend to grow more slowly and have smaller, less aggressive root systems.


Plant at Safe Distances

Here’s a general guide based on tree size:

  • Small trees (under 30 ft) – Plant at least 10 ft from structures
  • Medium trees (30–70 ft) – Plant 15–30 ft away
  • Large trees (70+ ft) – Plant 40–70 ft away

Always consider mature size, not the size at planting time.


Install Root Barriers

For trees that must be planted closer, consider installing root barriers—plastic or metal sheets that direct root growth downward and away from foundations.


Regular Maintenance

Annual pruning and root inspections can keep trees healthy and prevent unexpected issues. Avoid excessive watering or fertilizing near the foundation, as this can encourage root expansion.


What to Do If You Already Have a Problem Tree

Exposed tree roots from erosion. Møns Klint, Denmark.

If you suspect a nearby tree is putting your home at risk:

  1. Consult a Certified Arborist – They can evaluate the species, root growth, and overall health.
  2. Have a Foundation Specialist Inspect Your Home – They can detect early damage or shifting that you may not see.
  3. Consider Removal or Relocation – In some cases, the tree may need to be removed. This should be done by professionals to avoid property damage or injury.
  4. Repair and Prevent – If damage has occurred, fix it quickly to prevent it from worsening, and take steps to prevent further root intrusion.

Cost of Ignoring the Problem

Delaying action on root-related issues can lead to expensive repairs:

  • Foundation repair: $5,000–$30,000
  • Sewer line replacement: $3,000–$10,000
  • Tree removal (especially near structures): $500–$3,000+

Proactive landscaping and inspection can save thousands in the long run.


Final Thoughts

Trees can be one of your property’s greatest assets—or one of its biggest threats. Knowing which species to avoid near your home is key to protecting your foundation, plumbing, and peace of mind.

Before planting any tree, do your research on root behavior and mature size. And if you already have large trees near your house, consider consulting an arborist to evaluate their impact. A little planning goes a long way in keeping both your home and your trees safe and thriving.

How to Tell If Your Tree Needs Professional Pruning

How to Tell If Your Tree Needs Professional Pruning

Trees are among the most beautiful and valuable assets in your landscape. Not only do they add shade, privacy, and visual appeal, but healthy, well-maintained trees can also increase your property’s value. However, like any living organism, trees require proper care to thrive—and pruning is one of the most essential maintenance tasks.

While it might be tempting to grab a pair of shears and start trimming branches yourself, improper pruning can cause more harm than good. That’s why it’s crucial to understand when a tree actually needs professional pruning—and what signs to look for.

In this article, we’ll guide you through the most common indicators that it’s time to call in a certified arborist, the risks of delaying pruning, and how professional pruning benefits your trees (and your safety).


Why Is Tree Pruning Important?

Before jumping into the warning signs, let’s quickly recap why pruning matters.

Proper pruning:

  • Encourages healthy growth and structure
  • Removes diseased, damaged, or dead branches
  • Reduces the risk of falling limbs
  • Prevents interference with power lines and buildings
  • Improves sunlight exposure and air circulation
  • Enhances the tree’s natural shape and beauty

Professional pruning is more than just a cosmetic task—it’s vital for the long-term health and safety of your tree.


Signs Your Tree Needs Professional Pruning

Here are the key indicators that your tree might be due for a professional trim:

1. Dead, Dying, or Diseased Branches

Dead wood is not just unsightly—it’s dangerous. These branches are brittle, break easily, and could fall during a storm or high winds. Signs of dead or diseased branches include:

  • No leaves or budding during the growing season
  • Brittle texture or cracking bark
  • Fungus or mushroom growth at the base or on limbs
  • Discolored or decaying wood

Don’t ignore these signs—dead branches should be removed promptly by a certified arborist to prevent further decay and reduce safety hazards.


2. Overgrown or Misshapen Canopy

If your tree’s canopy looks too dense, unbalanced, or “top-heavy,” it may need thinning or shaping. Excessive branch density:

  • Blocks sunlight from reaching lower limbs or your lawn
  • Increases wind resistance, which can cause breakage in storms
  • Prevents proper air circulation, making the tree more vulnerable to disease

A skilled arborist can selectively prune branches to improve light penetration and restore a more natural, balanced shape.


3. Branches Touching Structures or Power Lines

One of the clearest signs you need professional help is when branches begin encroaching on:

  • Rooflines or gutters
  • Windows and siding
  • Fences, sheds, or garages
  • Utility wires or telephone poles

This isn’t just a nuisance—it’s a serious safety risk. Trees growing too close to power lines can cause electrical outages, fires, or electrocution hazards. Never attempt to trim near power lines yourself—this job is strictly for professionals with the right equipment and training.


4. Storm Damage

Strong winds, lightning, and ice can cause severe damage to trees, leaving behind:

  • Broken limbs
  • Split trunks
  • Uprooted branches

Even if the damage isn’t obvious, hidden stress cracks can weaken your tree’s structure over time. A professional pruning assessment after a storm ensures any dangerous or unstable branches are properly removed before they cause injury or property damage.


5. Crossing or Rubbing Branches

When branches grow too closely together, they may rub against one another, causing:

  • Bark wounds
  • Entry points for pests and disease
  • Structural weakness

Over time, this can severely affect your tree’s health. A professional will know how to prune these branches in a way that prevents future problems and encourages healthy spacing.


6. Unusual Growth Patterns

Trees sometimes grow in odd, unnatural ways due to:

  • Competition for sunlight
  • Damage from previous storms or improper pruning
  • Genetic abnormalities

This can result in:

  • Leaning trunks
  • Multiple leaders (competing main stems)
  • Low-hanging limbs that block pathways

These conditions require careful correction to avoid long-term issues. A trained arborist can prune selectively to redirect growth and reinforce structural integrity.


7. Excessive Leaf Drop or Poor Health

If your tree is dropping leaves out of season, growing sparse foliage, or looking generally unhealthy, it may be under stress. While there are many potential causes (pests, disease, drought), overgrowth or dead limbs can exacerbate the problem.

Pruning away unnecessary or unhealthy growth allows the tree to redirect energy toward healthy branches and encourages recovery.


Why Hire a Professional Arborist?

Process of Shaping the Tree in the Backyard Garden by Pruning the Overgrown Branches with Garden Scissors. Caucasian Garden Landscaper Doing His Job.

You might wonder, “Can’t I just prune it myself?” While light pruning of small branches is manageable for most homeowners, professional pruning is highly recommended for larger trees or when dealing with disease, structural issues, or safety concerns.

Here’s why hiring a certified arborist is a wise choice:

Safety First

Tree work is one of the most dangerous maintenance tasks. Professionals have the tools, knowledge, and safety equipment to handle risky jobs—especially when working at heights or near power lines.

Expert Diagnosis

An arborist can spot early signs of disease, decay, or structural weakness that may not be obvious to the untrained eye. This allows for proactive care instead of costly emergency removals later.

Proper Technique

Improper pruning—like topping, excessive cutting, or removing the wrong limbs—can permanently damage a tree. Arborists follow industry standards to prune safely without compromising the tree’s health.

Long-Term Tree Health

A well-pruned tree is more resilient against storms, pests, and disease. It also grows in a more aesthetically pleasing and balanced way, enhancing your property’s curb appeal.


When Is the Best Time to Prune?

While pruning can be done year-round depending on the species and goals, there are general guidelines:

  • Late winter to early spring (before new growth): Ideal for most trees, as they are dormant and less vulnerable to stress.
  • Summer: Good for slowing unwanted growth or after storms.
  • Fall: Generally avoided due to higher risk of disease transmission.

Always consult an arborist for the best timing specific to your tree’s species and condition.


Final Thoughts: Don’t Wait Until It’s Too Late

Pruning isn’t just a cosmetic task—it’s essential to your tree’s health, your safety, and your property’s appearance. If you notice dead limbs, odd growth, storm damage, or branches threatening your home, don’t put it off.

A certified arborist can evaluate your tree’s condition and recommend the appropriate course of action. Whether it’s preventive maintenance or post-storm care, professional pruning pays off in the long run—saving you money, stress, and potentially even lives.


7 Fast‑Growing Privacy Hedges That Last for Decades

7 Fast‑Growing Privacy Hedges That Last for Decades

A lush, green hedge isn’t just about aesthetics—it’s a living wall of privacy, noise reduction, wind protection, and even wildlife habitat. But if you’re starting from scratch, you likely want fast growth without sacrificing longevity. The perfect privacy hedge grows quickly, fills out thickly, and sticks around for decades with proper care.

In this article, you’ll discover seven top fast-growing hedge varieties that thrive across various climates and conditions. Each is selected for its speed, durability, and suitability as a long-term privacy screen. You’ll also find tips on planting, care, and how to choose the right hedge for your space.


What Makes a Good Privacy Hedge?

Before we get into the list, here’s what sets a great hedge apart:

  • Fast Growth Rate: Ideally 1 to 3 feet per year.
  • Evergreen Foliage: For year-round privacy.
  • Thick, Dense Growth: Prevents see-through gaps.
  • Toughness: Withstands pruning, weather, pests, and poor soil.
  • Longevity: Can thrive for decades with proper care.

1. Leyland Cypress

(Cupressus × leylandii)

Why it’s popular:

Leyland Cypress is a classic for quick-growing privacy. Its upright, feathery foliage forms a dense green wall in just a few years.

  • Growth rate: 3 to 5 feet per year
  • Mature height: 40–60 feet
  • Best for: Tall, full privacy screens
  • Lifespan: 20–25+ years with proper pruning

Care tips:

  • Requires full sun and well-drained soil.
  • Water regularly during establishment.
  • Prune annually to maintain desired height and prevent legginess.

2. Thuja ‘Green Giant’

(Thuja standishii × plicata)

Why it’s great:

Thuja ‘Green Giant’ is a fast-growing arborvitae hybrid that resists pests and grows in a dense, conical form. It’s more resilient and less disease-prone than Leyland Cypress.

  • Growth rate: 3 to 4 feet per year
  • Mature height: 30–50 feet
  • Best for: Formal or informal green walls
  • Lifespan: 40+ years

Care tips:

  • Prefers full sun, but tolerates partial shade.
  • Water deeply in dry periods.
  • Prune lightly to shape once or twice a year.

3. Privet

(Ligustrum spp.)

Why it’s classic:

Privet is known for its quick growth, thick foliage, and tolerance for shaping. It can be evergreen or semi-evergreen, depending on the species and climate.

  • Growth rate: 2 to 3 feet per year
  • Mature height: 8–15 feet
  • Best for: Medium-height hedges and formal gardens
  • Lifespan: 30+ years with regular pruning

Care tips:

  • Grows well in sun or part shade.
  • Prune frequently for dense growth and to avoid legginess.
  • Tolerates a variety of soils.

4. Cherry Laurel

(Prunus laurocerasus)

Why it’s lush:

This broadleaf evergreen features glossy dark-green leaves and tolerates shade better than most fast-growing hedges.

  • Growth rate: 2 feet per year
  • Mature height: 10–20 feet
  • Best for: Shaded borders and evergreen walls
  • Lifespan: 30–40 years with minimal issues

Care tips:

  • Thrives in full sun to full shade.
  • Needs moist, well-drained soil.
  • Prune after flowering to maintain shape and size.

5. Photinia ‘Red Robin’

(Photinia × fraseri)

Why it stands out:

Known for its vibrant red new growth, Photinia adds both privacy and ornamental flair. It forms a dense screen when properly maintained.

  • Growth rate: 1.5 to 2 feet per year
  • Mature height: 10–15 feet
  • Best for: Decorative hedges with seasonal color
  • Lifespan: 20–30 years with good care

Care tips:

  • Needs full sun for best leaf color.
  • Prune regularly to encourage fresh red foliage.
  • Avoid waterlogged soils.

6. Bamboo (Clumping Varieties)

Why it’s unique:

Clumping bamboo grows quickly and densely—without becoming invasive like running types. It’s a favorite in modern and tropical gardens.

  • Growth rate: 2 to 4 feet per year
  • Mature height: 10–30 feet (variety dependent)
  • Best for: Narrow spaces or exotic looks
  • Lifespan: 20–50+ years depending on species

Care tips:

  • Choose clumping, not running, bamboo.
  • Prefers full sun to part shade.
  • Needs regular watering and organic mulch.
  • Thin out old canes every few years.

7. Elaeagnus ebbingei

(Silverberry / Oleaster)

Why it’s tough:

Elaeagnus is an underappreciated hedging plant with attractive silver-green foliage. It grows well in poor soils, tolerates salt, and handles wind like a champ.

  • Growth rate: 1.5 to 2 feet per year
  • Mature height: 8–12 feet
  • Best for: Coastal or drought-prone areas
  • Lifespan: 30–40 years

Care tips:

  • Thrives in full sun to partial shade.
  • Adaptable to most soils, including sandy and dry.
  • Prune lightly once or twice a year.

Bonus: Mixed Hedges

If you prefer a natural, diverse look, consider mixing two or more hedge types. For example:

  • Combine Photinia and Elaeagnus for color contrast.
  • Use Privet with Cherry Laurel for texture variety.
  • Mix Thuja and Bamboo in different sections for a layered look.

This also helps reduce the risk of entire hedge failure due to disease or pests.


Tips for Long-Term Success

To get a hedge that grows fast and lasts decades, follow these golden rules:

1. Plan Proper Spacing

  • Avoid planting too close — give room for root growth and air circulation.
  • Most hedges need spacing of 3 to 6 feet between plants.

2. Start With Healthy Soil

  • Loosen compacted soil.
  • Add compost or aged manure to improve fertility and drainage.

3. Water Consistently (Especially in Year 1–2)

  • Deep watering is better than frequent shallow watering.
  • Mulch to retain moisture and reduce weeds.

4. Prune for Density

  • Regular trimming encourages branching and thick, full growth.
  • Start pruning early, even if it means delaying height growth a little.

5. Feed Annually

  • Apply a balanced fertilizer in spring to fuel growth.
  • Organic compost or mulch can be a slow-release nutrient source.

Common Mistakes to Avoid

  • Using invasive bamboo species – Always choose clumping varieties.
  • Overcrowding plants – Leads to disease, weak growth, and poor air flow.
  • Skipping pruning – Letting a hedge grow wild often results in thin, bare patches.
  • Ignoring soil quality – Even fast growers need good drainage and nutrients.

Final Thoughts

A fast-growing hedge doesn’t mean you’re settling for short-term solutions. With the right choice, you can enjoy decades of green privacy, beauty, and function.

Among the top choices—Leyland Cypress, Thuja Green Giant, Privet, Cherry Laurel, Photinia, Clumping Bamboo, and Elaeagnus—there’s a solution for every climate, style, and purpose.


If you’d like a personalized hedge recommendation for your local climate (like Nagpur or similar tropical regions), just let me know. I’d be happy to tailor this list based on sun, rainfall, and space.