
There’s something magical about pulling a fresh, vibrant orange carrot straight out of the soil — crisp, sweet, and spotless. Imagine having that experience not just once a year, but in every season, right in your own home.
The viral YouTube video “How to Grow Carrots at Home Very Simple, Every Season Has Clean Carrots to Eat” shows just how easy and rewarding it is to grow carrots without needing a big garden or expensive tools. With the right container, soil mix, and care, anyone — even beginners — can enjoy a steady supply of homegrown carrots that are cleaner, tastier, and healthier than store-bought ones.
This detailed 1200-word guide will walk you through everything you need to know: from choosing the best carrot variety and preparing soil to harvesting perfect carrots year-round. Let’s get your carrot garden started!
Why Grow Carrots at Home?
Carrots are among the easiest and most rewarding vegetables to grow at home. They don’t need much space and thrive well in pots, grow bags, or containers.
Here’s why growing your own carrots is worth it:
No Chemicals: You control what goes into your soil — no pesticides or additives.
Fresh Anytime: Harvest crunchy carrots whenever you want.
Clean and Hygienic: Homegrown carrots are free from mud, insects, and residue.
Perfect for Small Spaces: Even apartment balconies or windowsills can host a mini carrot garden.
Year-Round Possibility: With the right setup, you can grow carrots in all seasons.
Home gardening not only saves money but also gives the satisfaction of growing your own healthy food.
Step 1: Choosing the Right Carrot Variety
Not all carrot types are ideal for container or home gardening. Choose short and medium-root varieties that grow well in limited soil depth.
Best carrot varieties for home growing:
- Nantes: Sweet flavor, uniform size, and easy to grow.
- Chantenay: Short and thick roots, great for containers.
- Mini or Baby Carrots: Perfect for shallow pots or boxes.
- Imperator: Long, slender roots for deeper containers.
If you’re just starting out, Nantes or Chantenay varieties are highly recommended — they’re forgiving and yield consistently.

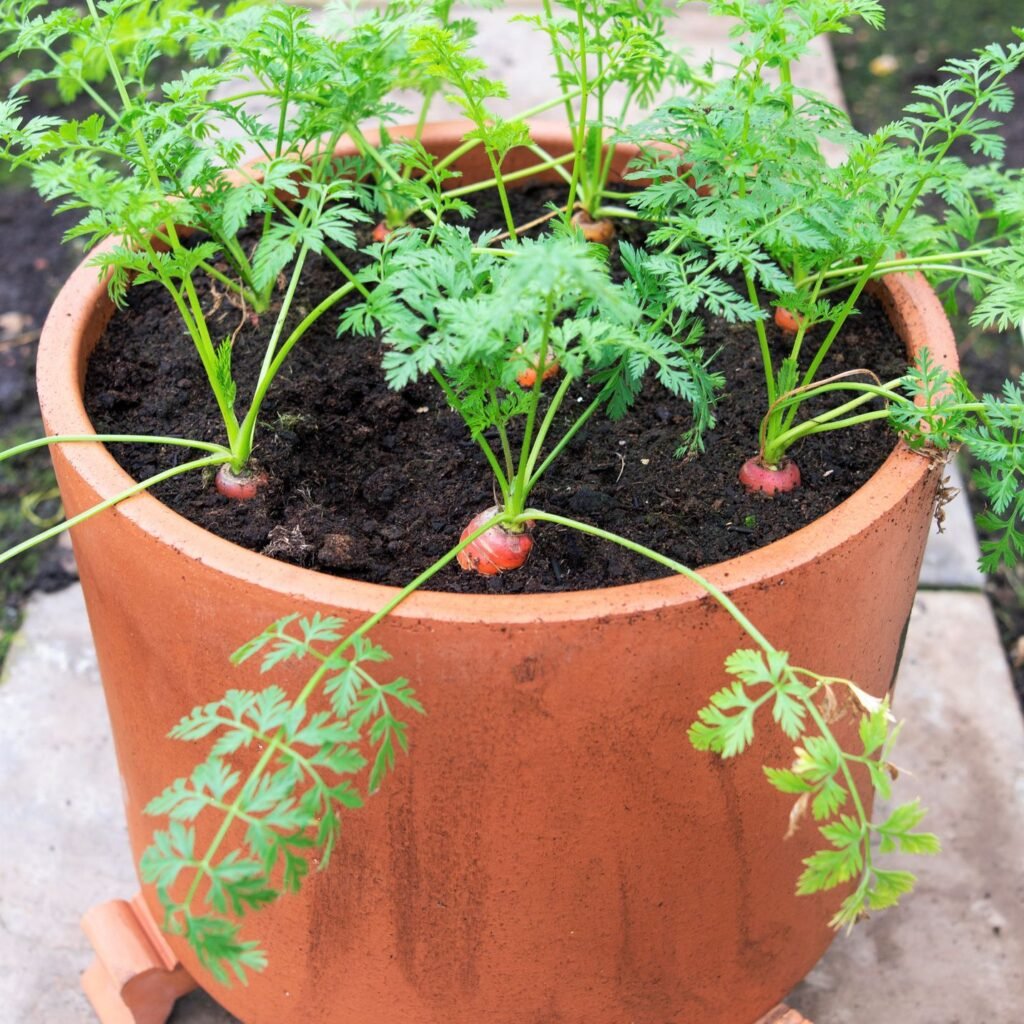
Step 2: Choosing the Right Container
Carrots grow underground, so container depth is key.
Ideal container features:
- Depth: At least 12 inches (30 cm) deep for medium carrots.
- Width: 12–18 inches wide for multiple plants.
- Drainage holes: Essential to prevent waterlogging.
You can use plastic pots, grow bags, old buckets, or even recycled bottles — just make sure the depth suits your chosen variety.
If you’re short on space, try vertical gardening with stacked containers or hanging pots.
Step 3: Preparing the Perfect Soil Mix
Carrots need loose, well-draining, and nutrient-rich soil. Hard or compacted soil leads to crooked or stunted carrots.
Recommended soil mix:
- 40% garden soil or topsoil
- 40% compost or well-rotted cow manure
- 20% sand or coco peat
This mix ensures proper aeration for root growth and moisture retention.
Pro Tip: Avoid fresh manure or excess nitrogen fertilizer — it causes carrots to fork or split.
Step 4: Sowing the Seeds
Carrot seeds are tiny, so handle them carefully.
Steps to sow:

- Fill the container with prepared soil, leaving 1–2 inches at the top.
- Sprinkle seeds evenly across the surface — spacing about 1 inch apart.
- Cover lightly with a thin layer (¼ inch) of fine soil or compost.
- Mist gently with water using a spray bottle.
- Cover the pot with a damp cloth or plastic sheet until seeds germinate (usually 7–10 days).
Keep the soil consistently moist during this stage — never let it dry out.
Step 5: Providing Sunlight and Ideal Temperature
Carrots love cool to moderate temperatures and plenty of light.
- Sunlight: 5–6 hours of direct sunlight daily.
- Temperature: 15°C–25°C (59°F–77°F) for best growth.
In hot climates, place containers where they get morning sun and afternoon shade. If you’re growing indoors, position them near a south-facing window or use LED grow lights.
Step 6: Watering Properly
Carrots need regular, gentle watering. Uneven watering can lead to cracked or deformed roots.
Tips for watering:
- Keep soil evenly moist, not soggy.
- Water lightly every morning or every alternate day.
- Avoid flooding — too much water suffocates the roots.
- In hot weather, mist the top layer to prevent drying.
You’ll know you’re watering right when the soil feels moist about 1 inch deep.
Step 7: Thinning and Spacing
Once seedlings are about 2–3 inches tall, thin them to avoid overcrowding.
- Keep one healthy plant every 2 inches (5 cm).
- Gently pull out the extras — use them in salads as baby greens!
Proper spacing ensures each carrot has enough room to grow straight and plump.
Step 8: Feeding Your Carrots Naturally
Carrots are light feeders, but a small nutrient boost helps them thrive.
Feed your plants every 15 days with:

- Organic liquid fertilizer: Mix 2 tablespoons of seaweed extract or compost tea in 1 liter of water.
- Homemade mix: Blend banana peel powder, eggshell powder, and a pinch of Epsom salt for added calcium and potassium.
Avoid high nitrogen fertilizers (like urea) as they promote leafy tops instead of healthy roots.
Step 9: Managing Pests and Diseases Naturally
Homegrown carrots are less prone to pests, but it’s good to stay alert.
Common pests:
- Aphids (tiny insects on leaves)
- Carrot flies (larvae that attack roots)
Prevention tips:
- Rotate your containers — don’t plant carrots in the same soil repeatedly.
- Spray neem oil (1 tbsp per liter of water) every two weeks.
- Keep the garden area clean and remove yellowing leaves.
Healthy soil and proper drainage naturally deter most issues.
Step 10: Seasonal Growing Tips — Grow Carrots Year-Round
One of the most exciting parts of the “Every Season Has Clean Carrots to Eat” method is growing continuously.
Here’s how to adjust for each season:
Spring: Ideal for sowing — carrots grow quickly and evenly.
Summer: Use shade nets and water more frequently to keep soil cool.
Monsoon: Ensure good drainage and cover pots during heavy rain.
Winter: Perfect weather — roots become sweeter due to cool temperatures.
By staggering your plantings every 3–4 weeks, you’ll have fresh carrots ready for harvest throughout the year!
Step 11: Checking Growth and Care Routine
During growth, keep an eye on your plants:

- Healthy carrot leaves are bright green and upright.
- If leaves yellow, check for overwatering or lack of nutrients.
- Loosen the topsoil occasionally to promote air flow.
When carrot tops start pushing slightly above the soil, it’s a sign they’re nearing maturity.
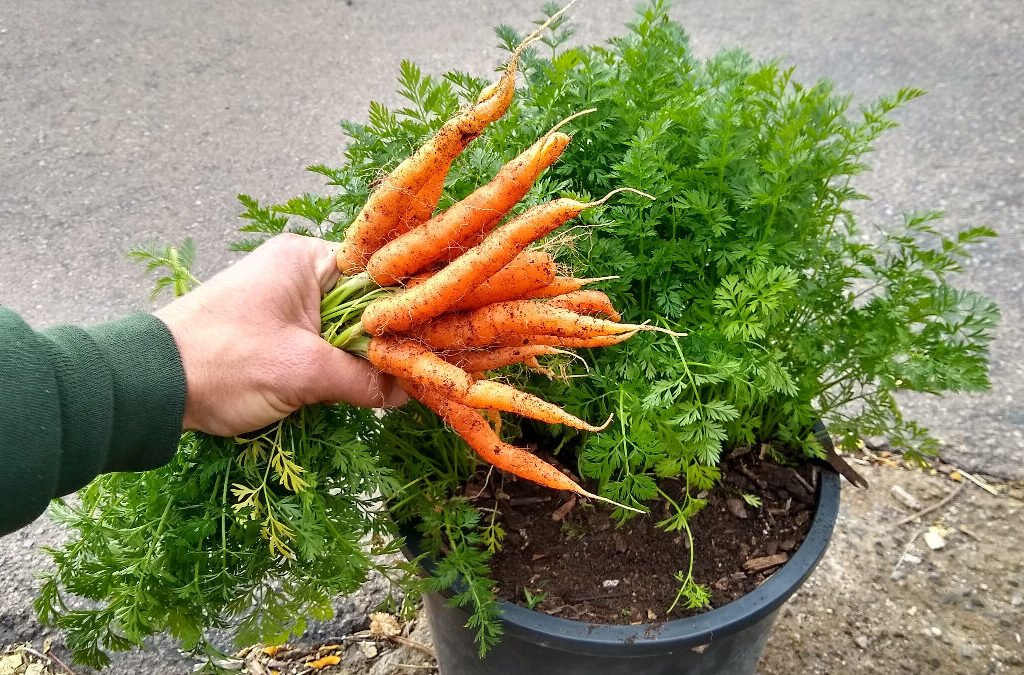
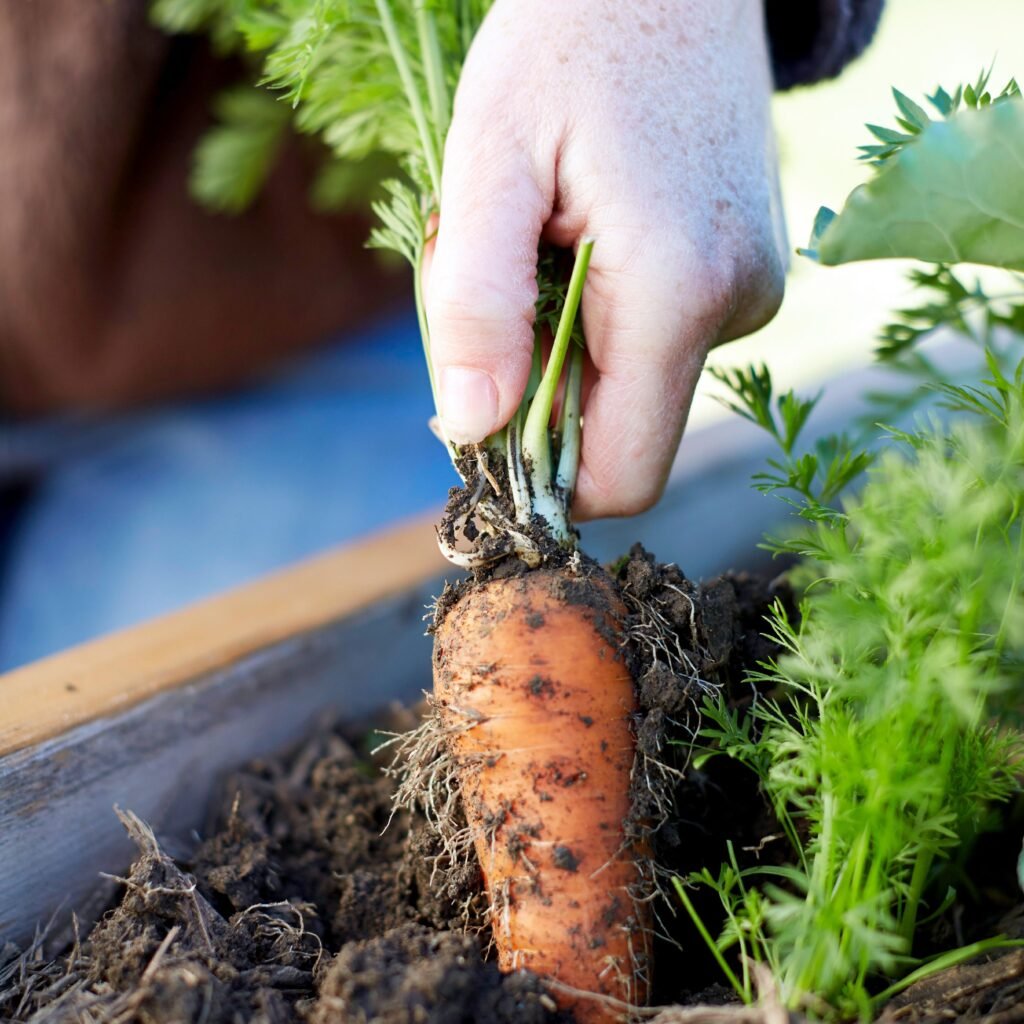
Step 12: Harvesting Your Carrots
Depending on variety, carrots are ready to harvest 70–90 days after sowing.
How to harvest:
- Water the soil lightly to soften it.
- Hold the leaves near the base and pull gently.
- If soil is hard, use a small fork to loosen it first.
- Brush off soil and rinse the carrots clean.
You’ll notice how clean, smooth, and fresh homegrown carrots look — no dirt clinging to them like store-bought ones!
Step 13: Replanting for the Next Harvest
After harvesting, you can reuse your soil and start again easily.
- Remove leftover roots and mix in some fresh compost.
- Add a bit of sand for aeration.
- Sow new seeds right away.
This cycle ensures you’ll have carrots every month with minimal effort.
Step 14: Bonus — Growing Carrots in Water (No Soil Method)

If you want to experiment, you can regrow carrot tops in water.
How to do it:
- Cut the top 1 inch of a carrot (with the green stem base).
- Place it in a shallow dish with water, ensuring the base is submerged.
- Change the water every 2–3 days.
- Within a week, new leaves and tiny roots will appear!
While this method won’t grow full carrots, you can use the greens in salads and soups.
Step 15: Storing and Using Homegrown Carrots
After harvesting, here’s how to keep them fresh:

- Remove the leafy tops (they draw moisture from roots).
- Store carrots in a perforated bag in the fridge.
- You can also blanch and freeze them for long-term storage.
Use your clean homegrown carrots for:
- Salads, soups, and stews
- Juices and smoothies
- Stir-fries and healthy snacks
Step 16: Benefits of Growing Carrots at Home
Homegrown carrots aren’t just delicious — they’re incredibly healthy and eco-friendly too.
Benefits include:
- High in Vitamin A and antioxidants.
- Boosts eye health and immunity.
- No exposure to chemicals or wax coatings.
- Encourages sustainable living and reduces waste.
- A relaxing hobby that brings joy to daily life.
When you bite into a crisp, sweet carrot you’ve grown yourself, it’s not just food — it’s an accomplishment.
Conclusion: Simple Steps to a Year-Round Carrot Garden
Growing carrots at home doesn’t require a big garden, fancy tools, or expert skills. Just a container, the right soil, and a little patience — and you’ll have clean, organic carrots growing in every season.
The method shared in “How to Grow Carrots at Home Very Simple, Every Season Has Clean Carrots to Eat” is proof that nature rewards simplicity. Once you see those green tops and pull out your first perfect carrot, you’ll be hooked.
So, roll up your sleeves, grab a handful of seeds, and start your home carrot garden today. Fresh, crisp, chemical-free carrots are just a few weeks away — and they’ll taste better than any you’ve ever bought!
Leave A Comment