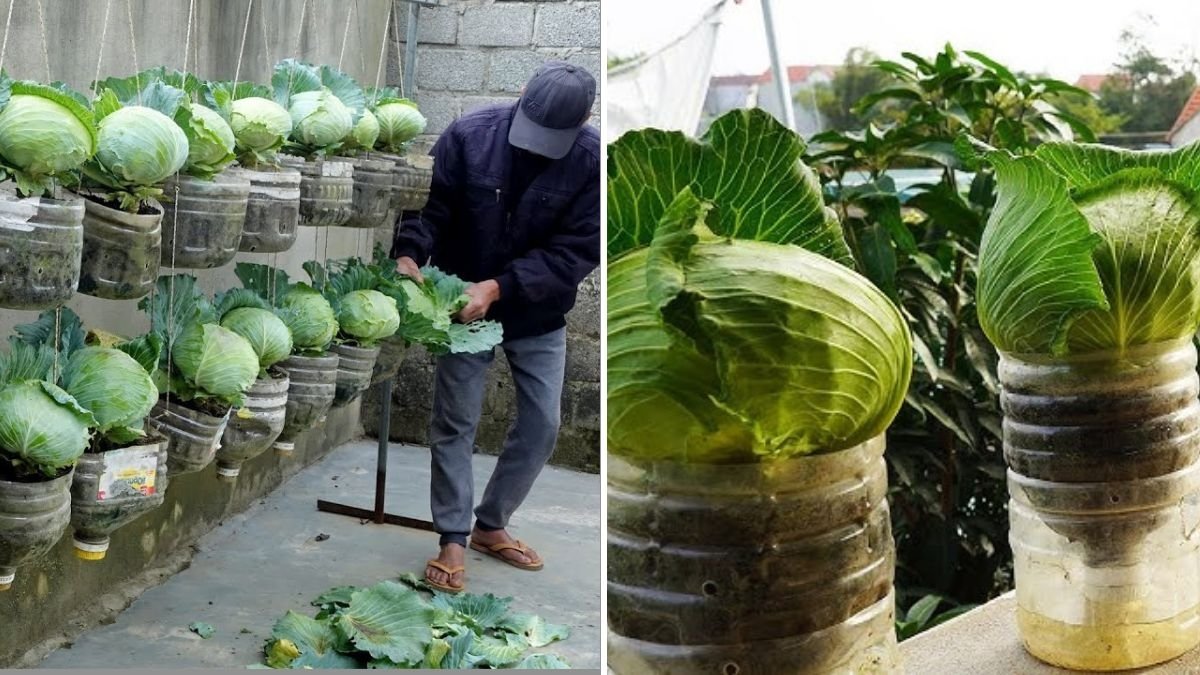
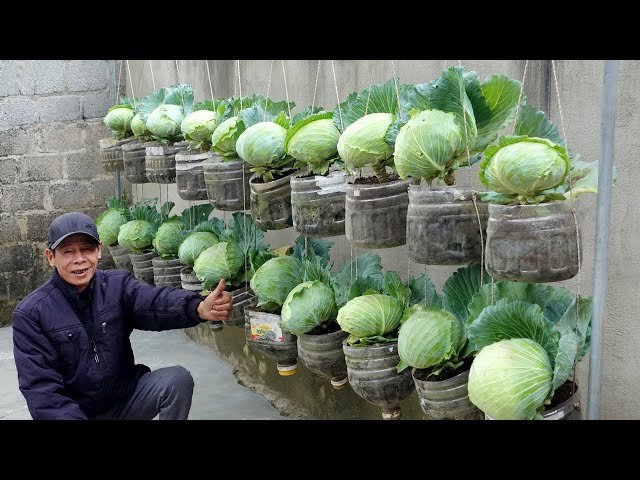
Imagine stepping out to your balcony or kitchen window and harvesting crisp, green cabbage heads — all grown in recycled plastic bottles. It’s not only possible, but also incredibly easy. The viral YouTube video “Housewives’ Dream Cabbage Garden: Growing Cabbage in Plastic Bottles” has shown how ordinary plastic waste can be transformed into a mini vegetable garden that produces fresh, organic cabbage right at home.
This method is perfect for those who dream of gardening but lack space or soil. Whether you live in a high-rise apartment or a small home, you can grow cabbage vertically using nothing more than plastic bottles, water, and sunlight.
In this complete 1200-word guide, we’ll explore the secrets behind growing cabbage in bottles — from choosing the right seeds and creating the perfect setup to caring for plants until harvest. Let’s turn your household recycling into a housewives’ dream garden!
Why Cabbage Is Perfect for Bottle Gardening
Cabbage is one of the easiest and most rewarding vegetables to grow in containers. It’s a cool-season crop that thrives in well-drained environments and moderate sunlight — making it ideal for balconies, windowsills, and small gardens.
By growing cabbage in plastic bottles, you can:
Save space through vertical gardening.
Reuse waste bottles sustainably.
Avoid soil-borne pests and diseases.
Control watering and nutrition precisely.
Harvest clean, chemical-free cabbage anytime.
This method is both eco-friendly and economical — perfect for housewives, beginners, and city gardeners alike.
Step 1: Choosing the Right Cabbage Variety
Before starting, select a variety of cabbage that fits your space and climate.
Best varieties for bottle growing include:
- Golden Acre: Compact and matures early (65–70 days).
- Red Express: Vibrant purple color and small heads.
- Copenhagen Market: Classic green variety with firm heads.
- Savoy Cabbage: Beautiful crinkled leaves and soft texture.
Choose compact or dwarf varieties since they adapt better to small containers.

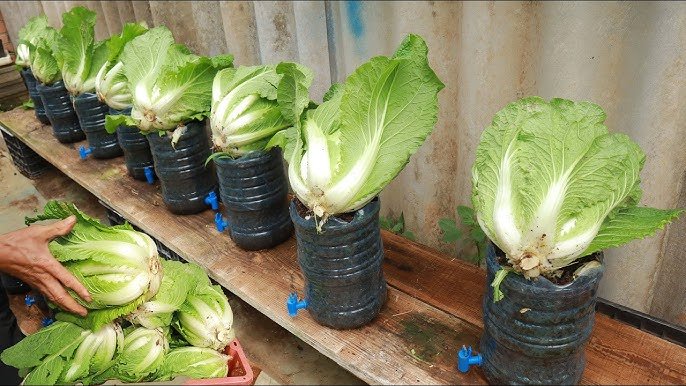
Step 2: Collecting and Preparing Plastic Bottles
You can grow cabbage using 1- to 2-liter plastic bottles — the kind used for soft drinks or water.
How to prepare the bottles:
- Clean thoroughly to remove any residue or labels.
- Cut the bottle horizontally — either halfway or near the bottom third.
- Use the bottom half for planting.
- You can also keep the top half inverted to act as a mini greenhouse cover.
- Drill or poke drainage holes at the bottom using a heated nail or knife.
- Add a layer of small stones or gravel for extra drainage.
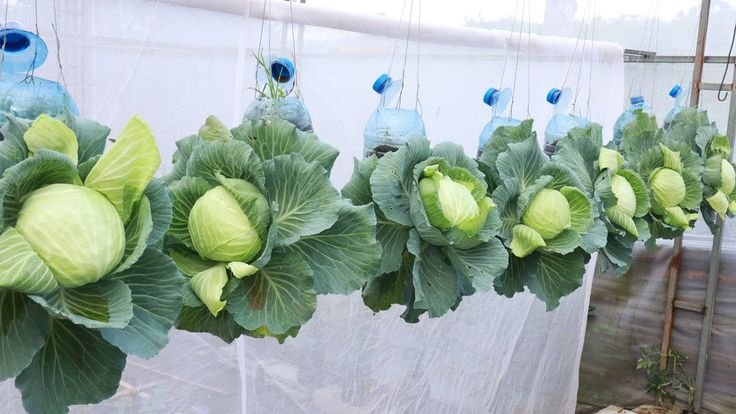
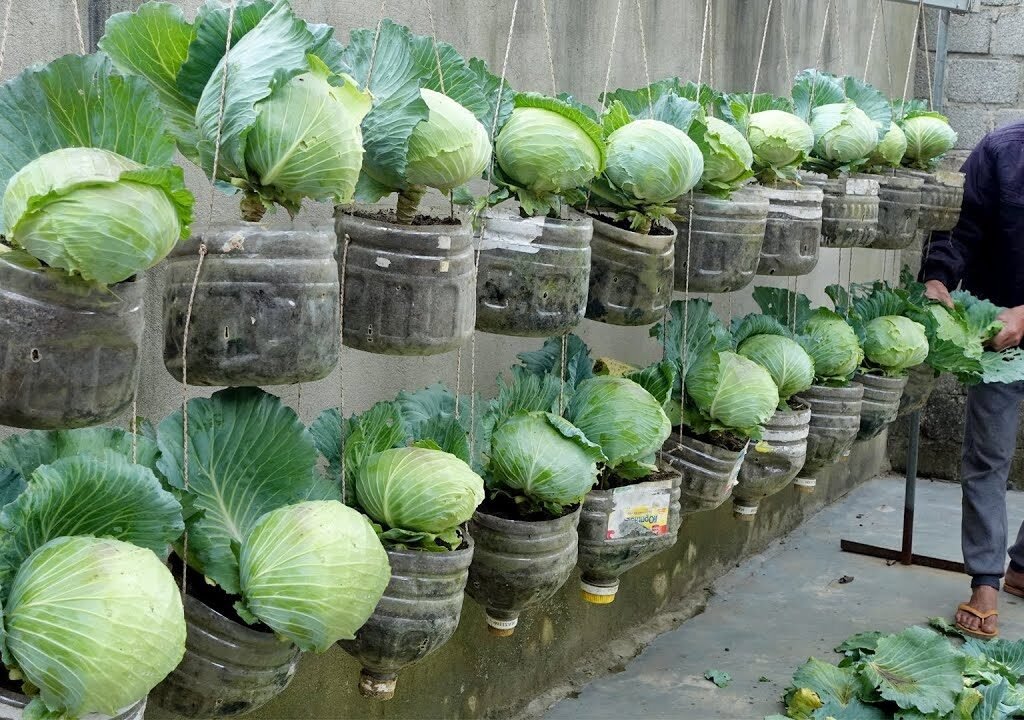
For vertical setups, you can hang bottles on a balcony wall, fence, or railing using twine or metal hooks.
Step 3: Preparing the Potting Mix
Since we’re not using soil from the ground, it’s important to create a light, fertile potting mix that supports root growth.
Ideal potting mix (per bottle):
- 40% garden soil or compost.
- 30% coco peat or peat moss (for moisture retention).
- 20% sand or perlite (for drainage).
- 10% organic manure or vermicompost (for nutrients).
Mix thoroughly and fill each bottle up to 3–4 inches below the rim. This space allows water to soak in without overflowing.
Step 4: Sowing the Seeds
You can either sow cabbage seeds directly in the bottles or start them in a seed tray and transplant later.
For direct sowing:
- Sow 3–4 seeds per bottle.
- Cover lightly with a thin layer of coco peat or compost.
- Mist the surface gently to moisten it.
- Keep in a semi-shaded area until germination.
For transplanting:

- Grow seeds separately in a tray or small pots until seedlings have 4–5 true leaves (about 3–4 weeks).
- Transplant one healthy seedling per bottle.
- Press gently and water well after transplanting.
Step 5: Proper Light and Temperature
Cabbage loves cool, bright conditions.
- Place bottles in a sunny area that receives 4–6 hours of direct sunlight daily.
- In extremely hot weather, provide partial shade using a cloth or net.
- Maintain temperatures between 15°C and 25°C (59°F–77°F).
If you’re growing indoors, place bottles near a south-facing window or use LED grow lights for 10–12 hours a day.
Step 6: Watering the Right Way
One of the biggest advantages of bottle gardening is controlled watering. Cabbage needs consistent moisture, but waterlogging can harm its roots.
Watering tips:
- Water gently when the top inch of soil feels dry.
- Avoid pouring too much — instead, mist slowly until evenly moist.
- In hot weather, water daily; in cooler months, every 2–3 days is enough.
- Add a small saucer or drip tray under each bottle to collect excess water.
Pro tip: Use a spray bottle or narrow-spout watering can to prevent soil displacement.
Step 7: Feeding Your Cabbage Plants

Cabbage is a heavy feeder, meaning it needs regular nutrition for healthy leaf and head formation.
Feed your plants every 10–14 days with:
- Organic liquid fertilizer: Mix 2 tablespoons of compost tea or seaweed extract in 1 liter of water.
- Homemade fertilizer: Combine banana peel powder, eggshell powder, and a pinch of Epsom salt in water for calcium and potassium boost.
- Hydroponic nutrient solution (optional): For those who prefer scientific precision, a mild NPK solution (10:5:5) works wonders.
Avoid over-fertilizing, as this can burn the roots or lead to leafy overgrowth without proper heads.
Step 8: Supporting Growth and Preventing Pests
Cabbage grown in bottles faces fewer pests than soil gardens, but you should still stay vigilant.

Common pests: Aphids, caterpillars, and whiteflies.
Natural pest remedies:
- Spray a neem oil solution (1 tbsp per liter of water) once a week.
- Use garlic or chili spray to deter insects naturally.
- Encourage beneficial insects like ladybugs if growing outdoors.
You can also place a fine mesh or net over young plants to protect them from butterflies that lay eggs.
Step 9: Mulching and Moisture Retention
To keep your mini cabbage garden thriving, retain moisture with mulching.
Add a thin layer of dry leaves, rice husk, or straw on top of the soil in each bottle. This prevents evaporation, keeps roots cool, and reduces weed growth.
If you’re using transparent bottles, wrap them with brown paper or cloth to block sunlight from heating the roots.
Step 10: Monitoring Growth
Within 2–3 weeks of transplanting, your cabbage plants will develop sturdy outer leaves.
Growth timeline:
- Weeks 1–3: Seed germination and early growth.
- Weeks 4–6: Leaf expansion — add nutrients every 10 days.
- Weeks 7–10: Cabbage head formation — reduce nitrogen slightly to encourage compact heads.
- Weeks 10–12: Ready for harvest!
Keep an eye on leaf color — healthy cabbage leaves are bright green and crisp. Yellowing or curling may indicate nutrient imbalance or excessive heat.
Step 11: Harvesting Cabbage from Plastic Bottles
Your cabbage is ready to harvest when the head feels firm and tight when pressed gently.

To harvest:
- Cut the cabbage head at the base using a sharp knife.
- Leave the outer leaves and roots in place — sometimes, small secondary heads may grow back.
- Rinse thoroughly and store in the refrigerator.
Each bottle can yield a medium-sized cabbage head (500–700g) — fresh, organic, and homegrown!
Step 12: Recycling and Replanting
After harvesting, don’t throw away the setup — simply refresh and reuse.
- Remove the old root system and top 2 inches of used soil.
- Refill with fresh compost and coco peat mix.
- Plant a new seedling immediately for continuous production.
This cycle allows you to grow cabbage year-round, ensuring a steady supply for your kitchen without needing a large garden.
Step 13: Creative Display Ideas for Your Bottle Cabbage Garden
Make your cabbage garden not only functional but also decorative!
Vertical Wall Garden: Attach bottles to a wooden frame or metal rack.
Hanging Garden: Suspend bottles using ropes or macramé hangers.
Window Garden: Line them up on a sunny windowsill for easy access.
Balcony Railing Setup: Tie bottles securely along railings for space efficiency.
The lush green cabbages will give your home a fresh, natural look while adding beauty to your space.
Step 14: Benefits of Growing Cabbage in Plastic Bottles
This sustainable gardening technique offers numerous benefits:
- Eco-Friendly: Reuses waste bottles and reduces plastic pollution.
- Budget-Friendly: No need for expensive pots or soil beds.
- Space-Saving: Ideal for small homes and balconies.
- Healthier Produce: No pesticides or chemicals.
- Therapeutic Hobby: Gardening relieves stress and boosts happiness.
It’s truly a “housewives’ dream” because it combines sustainability, creativity, and nutrition — all from your home.

Conclusion: Your Dream Cabbage Garden Awaits
Growing cabbage in plastic bottles is proof that you don’t need a backyard or fancy equipment to create a lush, productive garden. With just a few recycled bottles, some soil mix, and care, you can harvest fresh, crunchy cabbages right from your balcony or window.
The “Housewives’ Dream Cabbage Garden” idea is more than a viral trend — it’s a lifestyle shift toward sustainability, self-sufficiency, and smarter gardening.
So, don’t throw away those bottles — transform them into your very own mini cabbage farm. Once you taste the freshness of homegrown cabbage, you’ll never look at store-bought vegetables the same way again.
Leave A Comment